Static Site Generators (SSGs) are lightweight, fast, and clean ways to build blogs and text-heavy sites. They fall in between a using fully robust content management system such as Wordpress or Ghost and hand-coding every one of your pages. 0
If you've never used one before, the premise is straightforward: you write only the bare bones of your content, then the site generator compiles it – with theme, styling, and archiving – into a fully robust (but static) site. The two main benefits are that 1) it makes it easy to manage your site and content with version control such as GitHub, and 2) you get all of the benefits of a static site (speed, simplicity, no need for a backend) without the complications of manually updating every dependency or rollup that you'd normally have read from a dynamic database.
There's a number of static site generators out there. I've worked with two of the biggest ones – Jekyll and Hugo.1 I've also chosen to deploy them on GitHub pages because it's one less step of tool and infrastructure management, and because GitHub pages are free-as-in-beer.
While Jekyll is probably the easier one to set up and out-of-the-box supported by GitHub pages, I started with Hugo because the Go language that powers it seemed much more interesting than the Ruby that powers Jekyll.2 And despite a Hugo-powered static site being pretty easy to set up, I managed to run into quite a few issues that required copy-pasta'ing code and commands across a few different guides. So below is my all-in-one walkthrough for launching and deploying a Hugo-based site on GitHub pages. Hope it helps!
Getting Started With Hugo
The GoHugo.com quick start guide is very straightforward and I can't recommend it highly enough. If you want to get your feet wet, it's a less-than-5-minute set up that gets you working immediately with Hugo. You can find it here: https://gohugo.io/getting-started/quick-start/.
There isn't anything I can add or simplify there.
Creating New Content
Creating new content in Hugo is pretty simple. In the terminal, enter your Hugo directory and type:
hugo new posts/post-title.md
... where post-title.md is your actual post file name. (the .md is for Markdown). That will create a new post in your /content/ folder. Open that file with a code editor to start modifying it.
The blank post template is generated via your /archetypes/default.md file. You can update that to change what's present by default in your post when you first generate it. For example: I've added comments into my default.md template to remind me of how to structure posts, what notes to add, and a shortcode that I find myself commonly using. Here's an example: https://raw.githubusercontent.com/errorstates/errorstates_hugo/master/archetypes/default.md. It's just more helpful that way. ¯\_(ツ)_/¯
One last thing to note – Hugo works with a range of templating frameworks. Make sure that when you choose a theme you also use the correct framework for it. This might seem like a jumble of letters, but when I was first setting up my site I used a .yaml configuration for a .toml theme and it took forever for me to understand why it wasn't generating correctly.
Launching and Testing Locally
Once you have your post, you've made edits, and you want to test things before committing, you can compile and launch Hugo locally. In the terminal, enter your local Hugo directory and type:
hugo server -D
This will launch hugo locally with drafts visible (that's the -D, not to be confused with -d which is a destination string option. You can also type just hugo server to run it without drafts).
Now open up any browser and go to http://localhost:1313/ to see your site.
The server will rebuild every time you make changes and thus reflect those changes in near-real time. If you break something, it will give you an error message and show you where your code is wrong.
When you're done, press Control + C in the terminal to stop running the server.
Committing Code for Github Pages
Here's where things get complicated... GitHub pages are designed to support Jekyll out of the box... not Hugo. No big deal.
The way Hugo works is that you've got all of the configuration files and templates and back-end stuff that set the standards for every page and post you generate (and for the site as a whole). When you're ready, running the hugo command compiles it into one /public/ folder which reads entirely like normal .html pages and a website directory.
If you're hosting all of this on AWS or Netlify or DigitalOcean or something similar, it's a matter of pointing your server to read the /public/ folder as your primary directory. You can run Hugo as-designed, and everything makes a lot of sense.
But! For GitHub pages, you need the top-level directory to start with a proper index.html file (or similar). In Hugo's directory structure, that ends up being buried and so your pages won't work out of the box when you commit your code.
There are two workarounds. The first one is the most straightforward: only commit the contents of the compiled /public/ folder to GitHub. It's actually that simple. (You'll end up doing this one way or another, actually). The drawback of this approach is that you don't commit any of your Hugo or theme configurations, which is half the work you're doing.
The second option is to recognize that you'll need to have two GitHub repos: the first one will be your full working directory, everything Hugo-related. Your second repo will be only the final /public/ directory, which is what you'll use for GitHub pages. One way or another, public page will effectively end up being handled as a GitHub submodule 3 (though you don't might not end up using that specific functionality).
When I was reading walkthroughs on my first Hugo go-around, it took me a while to understand what it was they were trying to do, and why. Now that I've understood it and gotten it to work, it's a doh! moment. You're still welcome to simply commit the /public/ folder and keep things no-nonsense, but I recommend the steps below because if you're actually using GitHub, then you probably want to manage all of the code properly.
Here's how it works: 4
Start in GitHub by creating two repos:
hugosite_backend- This will be used to manage the full Hugo backend.yourgithubusername.github.io- The will be the final github.io page. You need to name it the same as the full final url, with your github username as the first part. GitHub is pretty clear on this.
Once you create those repos and load both of them onto your computer (GitHub desktop is fine), go to your site directory hugosite_backend and type git init to initialize git.
This is where you need to install and run Hugo. You can paste your local instance here, or simply start with a fresh install. Once everything is ready and you've tested on a local server ( hugo server -D), you can get started.
Make sure you're in the hugosite_backend directory. Type the following:
$ git init
$ hugo
$ hugo -d ../yourgithubusername.github.io
This will build your site in the hugo_backend directory, and then build the /public/ folder again into the proper Github.io site.
Next:
$ cd ../yourgithubusername.github.io
$ git init
$ git add .
$ git commit -m "your message"
$ git push origin master
Update the message to be your commit message. This commits your code to the github.io page.
Next:
$ cd ../hugosite_backend
$ git add .
$ git commit -m "your message"
$ git push origin master
This commits your backend code.
Assuming you've already checked the option for your yourgithubusername.github.io to be handled as a GitHub Page, you can now go to http://yourgithubusername.github.io and you should be good! If not - and assuming you didn't have any errors on commit – it could be one of two things: 1) You need to wait a few minutes for things to propagate. Or, 2) you need to update your GitHub pages settings.
Your site is now served for free by Github pages.
Note: If you've made changes somewhere else and have't updated your local code, the commit will fail and you'll see an error in your terminal. You'll need to merge your code bases locally first by typing git pull in the correct directory and merging.
Automating Deployment
Once you've gotten the hang of it, you can automate the deployment steps above via a shell script.
In your terminal, go to your Hugo backend and type:
$ touch deploy.shThis will create a deploy.sh file that you can edit with your favorite text editor or vim. Open that file and add the following code:
Make sure to update it with your correct repo names. I've annotated it on what each line does, should you need to make other changes. Feel free to remove the comments up top when you create your local version.
To run it, make sure you have made some site updates to deploy and via terminal in your backend, type the following:
$ chmod +x deploy.shThis will make your deploy script executable. To run it, type:
$ ./deploy.sh "Your optional commit message"Custom URLs
The last piece of the puzzle is setting up a custom URL. Like other things, this took me a few attempts to get right. If you've followed all the steps above faithfully, you'll need to do a few things:
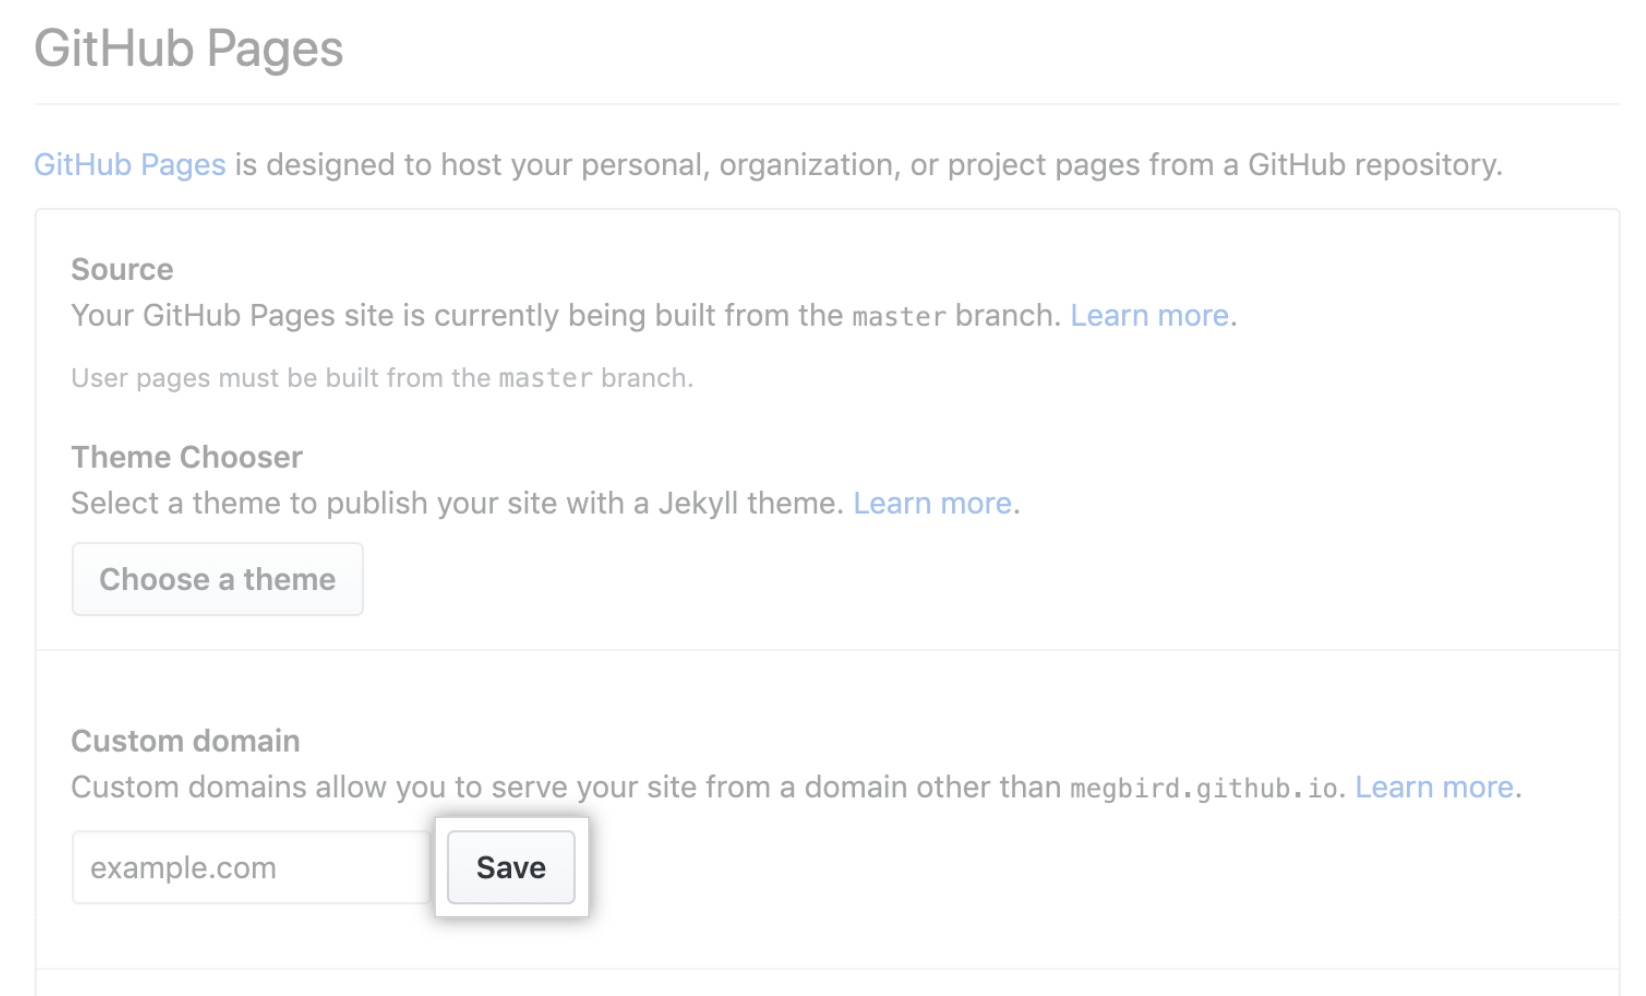
1. In your yourgithubusername.github.io GitHub repo, go to the Settings > GitHub Pages > Custom Domain. Add your domain there and click save.
This will generate a CNAME file in your directory. The contents will be just the url that you're using for the page.
2. Now take this file and copy it into your hugosite_backend repo into the /static/ folder. This will make sure that the file is replaced in the root /public/ folder when you compile the site next time.
3. In your config.toml file, make sure you set your site to read from your new custom domain by pointing the baseURL to your custom url. This will ensure that none of the links point back to the old site and create unnecessary redirects. It should look like this:
baseURL = "https://yourcustomurl.com/"
4. Now, in your domain manager (i.e., GoDaddy or Amazon Route 53 or Google URLs), update your DNS settings to look like this:
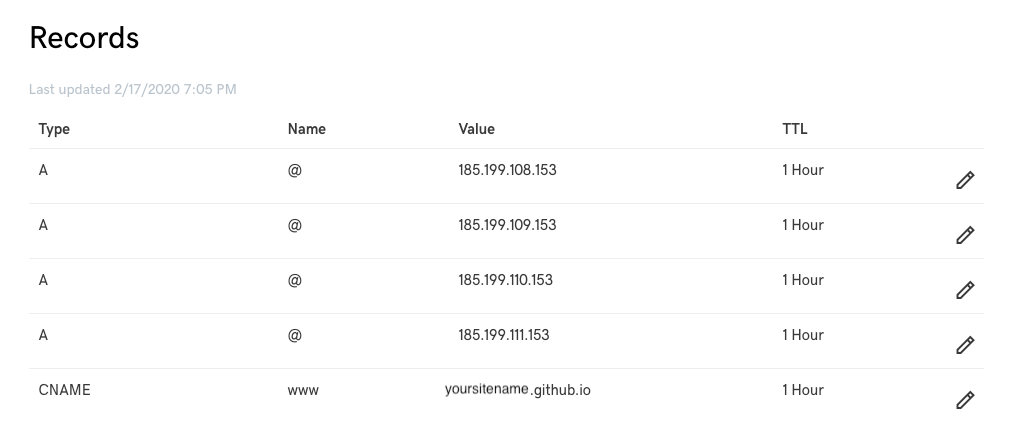
If you're using GoDaddy or have previously set values for your URLs, then you will need to remove all of the existing A and CNAME records as well... those point to placeholder pages. The IP addresses are GitHub pages' records.
This means you're need to add the following records:
Type  Name Value                  TTL
A     @	   185.199.108.153        1Hour
A     @	   185.199.109.153        1Hour
A     @	   185.199.110.153        1Hour
A     @	   185.199.111.153        1Hour
CNAME www  yoursitename.github.io 1Hour
Give it a few hours or a day to propagate and you should check back to see your page being hosted on your custom URL.
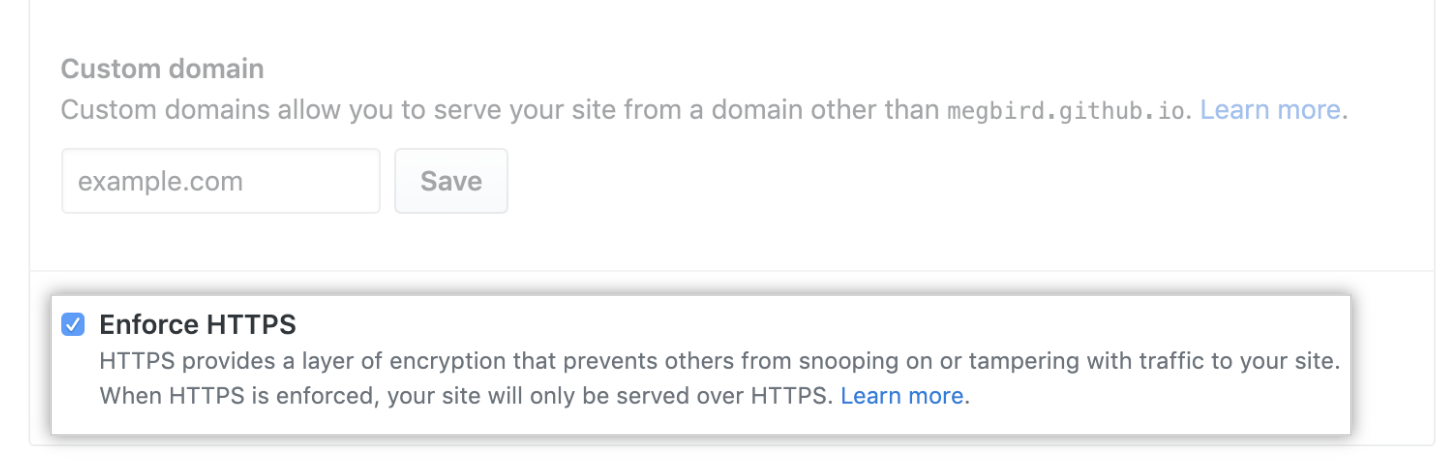
Last thing to do is to enforce HTTPS so that visitors to your site don't get security warnings when they visit. Luckily, you don't need to configure any certs (which can be a complicated process). GitHub allows you to Force HTTPS for all visitors and provides a self-signed certificate. Just check the following option for your page (available for both github.io pages and custom urls (though custom urls might take a few hours for the option to show up)):
Happy blogging!
Further Reference
I found the following pages helpful when I was getting started.
- Getting started with Hugo: https://gohugo.io/getting-started/quick-start/
- GitHub Pages: https://pages.github.com
- This helped me understand how Hugo built pages and the need for two repos: https://dev.to/dgavlock/creating-a-hugo-site-on-github-pages-3cjo
- Understanding Git Submodules: https://github.blog/2016-02-01-working-with-submodules/ and https://inside.getambassador.com/creating-and-deploying-your-first-hugo-site-to-github-pages-1e1f496cf88d and https://gohugo.io/hosting-and-deployment/hosting-on-github/
- Building a GitHub deploy script: https://gohugo.io/hosting-and-deployment/hosting-on-github/#put-it-into-a-script (But which was nearly useless for actually figuring out how to host on GitHub).
- On custom domains and GitHub pages: https://help.github.com/en/github/working-with-github-pages/managing-a-custom-domain-for-your-github-pages-site and https://www.godaddy.com/community/Managing-Domains/Custom-Domains-with-GitHub-Pages/td-p/133187 although the reality of the process was way easier than the GitHub walkthrough.
Footnotes:
0 - Though there do seem to exist CMSs for working with SSGs now. For example: https://forestry.io/
1 - This site -- as of 2020 -- is actually powered by Ghost (NodeJS and Handlebars scripting). My Hugo and Jekyll sites are side-projects.
2 - Turns out, you're not actually working with Go, you're working with markdown and basic scripting languages. For people accustomed to working with Wordpress and the PHP that underlies it, it was a little disappointing to find out that the Go was mainly backend stuff that I wasn't going to be touching. Oh well!
3 - https://github.blog/2016-02-01-working-with-submodules/. You can end up implementing this in a number of different ways, actually. My way doesn't require a github submodule but the feature was very helpful to understanding what was actually happening.
4 - The walkthrough here https://dev.to/dgavlock/creating-a-hugo-site-on-github-pages-3cjo helped a lot in putting things into context for me, so I'm pretty much just rewriting what they had at this point.
Thanks for reading
Useful? Interesting? Have something to add? Shoot me a note at roman@sharedphysics.com. I love getting email and chatting with readers.
You can also sign up for irregular emails and RSS updates when I post something new.
Who am I?
I'm Roman Kudryashov -- I help healthcare companies solve challenging problems through software development and process design. My longer background is here and I keep track of some of my side projects here.
Stay true,
Roman