
I like to use Ghost as my CMS/newsletter and it's worked quite well for me so far. I also run Recommended Systems as a Python/Flask app and figured, "can I use Ghost as both my company's blog and as my customer newsletter software?" (The short answer is yes.)
This walk through will show you how to keep your SaaS membership in sync with your Ghost setup, by creating a function in your Flask app that passes new users over to Ghost with specific tags for segmentation. Then, you can use those tags to send customer-specific release notes emails that you can send through Ghost as your newsletter software.
Step 0: Flask & Ghost
This walk through is not going to be a full walk through on how to build a Flask app or install Ghost. If you're interested in that, please follow those links to learn more.
So to start, you need to have (a) a working Flask app and (b) a working and properly configured Ghost installation. This walk through also assumes you understand what Flask Routes are and how they work.
Step 1: Configuring Ghost
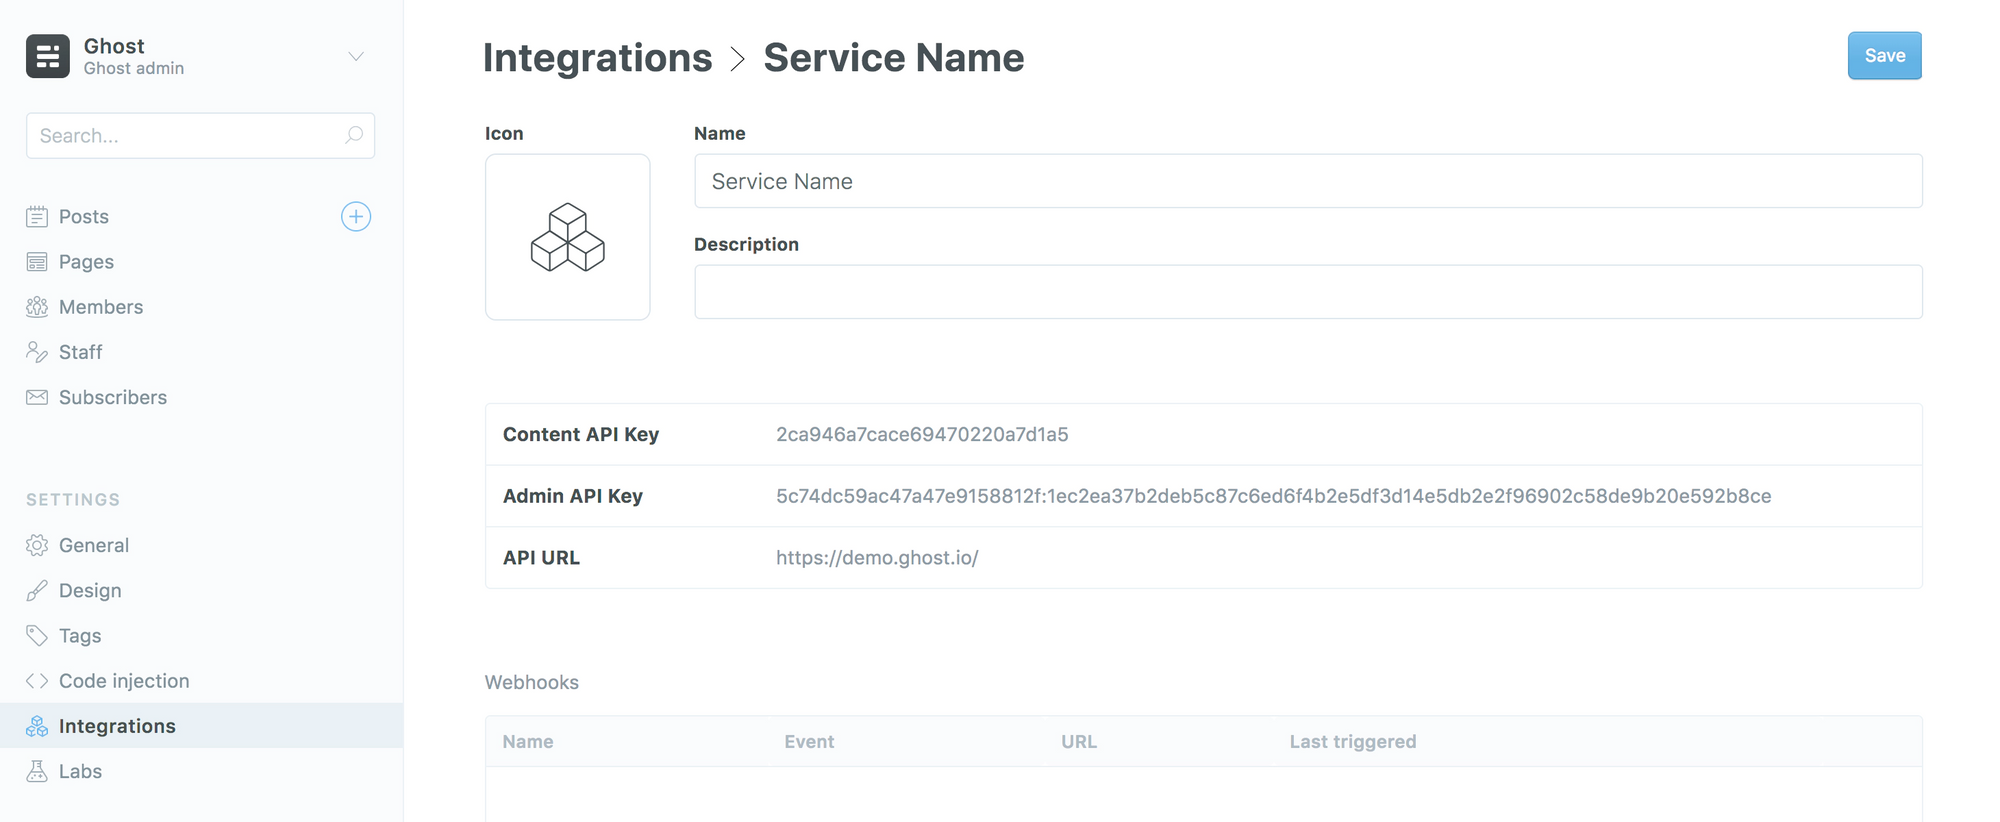
Getting The Ghost API Key
Once you have Ghost installed (and both types of email sending configured), log in to your admin console, go to Settings, then to the bottom of Settings and select "Integrations". Skip the "Built-In" stuff and scroll to the bottom to add a Custom Integration.
I named mine "Flask Member Connector" but feel free to call yours whatever you'd like.
Once you've done that, Ghost will generate an Admin API Key (it's the extra long one). You can access it at any time once its created, but I recommend copying it for reference for now.
Segmenting Members With Labels
Ghost can be used as a general blogging platform and can also be used for basic user segmentation (for membership programs and different email lists). This is done with Ghost's labels functionality.
For this project, I created a customer label to differentiate people who sign up for just my app's blog versus people who are app customers. But if you have a large list of members or already use a specific tag, you can use that too.
Step 2: Flask Configuration
Generating the Ghost Auth JWT Token
Ghost requires token-based authentication and helpfully offers some off-the-shelf libraries for generating JWT tokens in Python. The only python package requirements are jwt, requests, and datetime.
Here's the code Ghost provides for accessing their API:
import requests
import jwt
from datetime import datetime as date

# Admin API key goes here
key = 'YOUR_ADMIN_API_KEY'

# Split the key into ID and SECRET
id, secret = key.split(':')

# Prepare header and payload
iat = int(date.now().timestamp())

header = {'alg': 'HS256', 'typ': 'JWT', 'kid': id}
payload = {
    'iat': iat,
    'exp': iat + 5 * 60,
    'aud': '/admin/'
}

# Create the token (including decoding secret)
token = jwt.encode(payload, bytes.fromhex(secret), algorithm='HS256', headers=header)

# Make an authenticated request to create a post
url = 'http://localhost:2368/ghost/api/admin/posts/'
headers = {'Authorization': 'Ghost {}'.format(token)}
body = {'posts': [{'title': 'Hello World'}]}
r = requests.post(url, json=body, headers=headers)

print(r)
Note that this requires pip adding PyJWT (and not jwt). If you run into an issue where module 'jwt' has no option 'encode', then you've probably mixed the two packages up at some point. To fix that, uninstall both packages and reinstall the correct one:
# uninstall jwt and PyJWT
pip3 uninstall jwt
pip3 uninstall PyJWT

# install PyJWT
pip3 install PyJWT
Writing the Flask Function
We'll use Ghost's template for JWT token generating and include it as part of a larger Flask function that you can call from one of your routes.
They key changes and additions we're going to do are:
- Externalizing environment variables:
You don't want to accidentally reference and commit your API keys to a public cloud somewhere, so we need to importosso that you can reference variables in your .env file. I reference it asGHOST_KEYhere. Go ahead and create that now in your.env. - Setting the correct endpoints (for our purposes):
We're also going to update the inlineurlvariables (line 39) to reflect where your ghost admin is located and for the specific endpoint you're calling. In my snippet below, I also separated the base url from the endpoint to make it easier to switch out endpoints when you hit different APIs. If you're working with only one endpoint, you can keep it all as one url. - Adding the POST Body
This tells the API what we're looking to do, and I go over it in more detail below. - (And if you want to explore the full extent of Ghost's APIs, they are available here: https://ghost.org/docs/admin-api/#endpoints)
To make this all happen, create a new functions.py file in your Project's app directory. Writing this out as a separate function makes it easier for unit testing and reusability/modularity, but you can write this directly into a line as well.
Here's what our updated script looks like:
import os
import json
import requests
import datetime
from datetime import datetime, timedelta
import jwt

from dotenv import load_dotenv

# Set a path for pulling secrets from your .env file
basedir = os.path.abspath(os.path.dirname(__file__))
dotenv_path = os.path.join(basedir, ".env")
load_dotenv(dotenv_path)

"""
This script programmatically adds a user to Ghost as a "customer" label when they subscribe.
Token generation is pulled directly from the Ghost API: https://ghost.org/docs/admin-api/#members
"""

def update_ghost(name, email):
    key = os.environ.get("GHOST_KEY") # Admin API key goes here
    # Split the key into ID and SECRET
    id, secret = key.split(':')

    # Prepare header and payload
    iat = int(datetime.now().timestamp())

    header = {'alg': 'HS256', 'typ': 'JWT', 'kid': id}
    payload = {
        'iat': iat,
        'exp': iat + 5 * 60,
        'aud': '/admin/'
    }

    # Create the token (including decoding secret)
    token = jwt.encode(payload, bytes.fromhex(secret), algorithm='HS256', headers=header)

    # Make an authenticated request to create a post
    url_base = "https://[YOUR GHOST URL]"
    url_api = "/ghost/api/admin/members/"
    url = url_base + url_api # This is the endpoint URL for creating members.
    headers = {'Authorization': 'Ghost {}'.format(token)}
    body = {
        "members": [
            {
                "name": name,
                "email": email,
                "labels": [
                    {
                        "name": "Customer",
                        "slug": "customer"
                    }
                ]
            }
        ]
    }

    r = requests.post(url, json=body, headers=headers)

    print("Ghost Function:")
    print(r)
    print("----------------")
    # return jsonify({"update": str(r)}) # You can use this for testing. 201 is the response code you're looking for.
The POST Body
Line 43 starts the post body:
body = {
        "members": [
            {
                "name": name,
                "email": email,
                "labels": [
                    {
                        "name": "Customer",
                        "slug": "customer"
                    }
                ]
            }
        ]
    }
This is what you're passing along to Ghost when you hit the API.
The minimum required data for Ghost to create a new member is an email address. Because I capture the name of the user, I pass that as well. Note that Ghost accepts a single concatenated name field, so I personally have to concatenate first_name and last_name in my database into a single name field for Ghost to accept it.
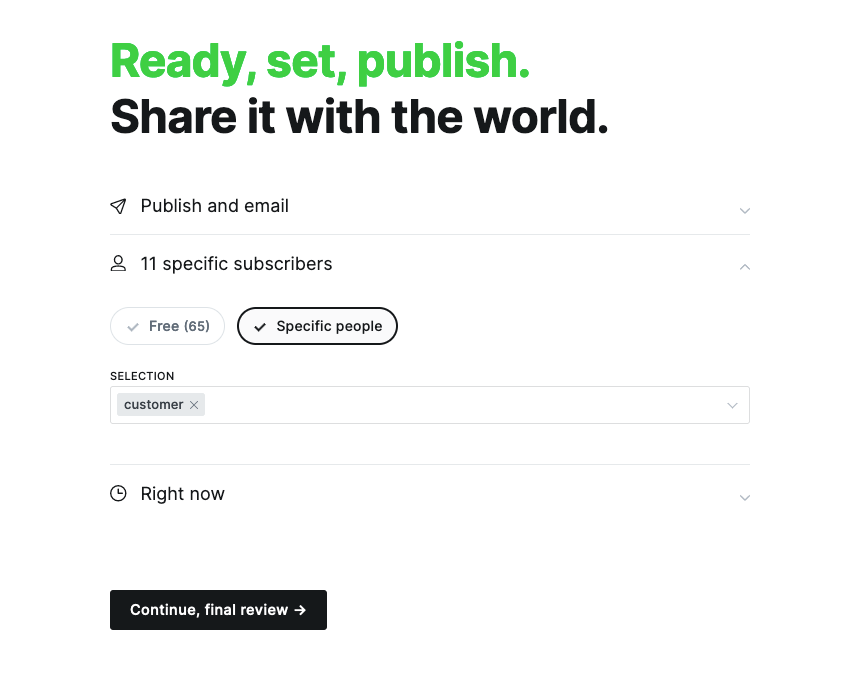
Lastly, I label all of the folks I add programmatically with the customer label we discusssed earlier, so that I can segment them out when I send emails.
This is the label you will select when choosing who to publish the email to. For example:
Call this function from your Flask Route
You're almost done!
Our goal for this connector is to create a new Ghost member whenever anyone signs up for our app. So you need to figure out where in your app you want to trigger this function.
I choose to do it after someone signs up and verifies their account by email (to avoid accidentally spamming people).
Once you've figured this out for yourself and found the route you're working with, add in the function before your final return call.
We defined the function above as def update_ghost(name, email) , which means we need to do a few things when we call it:
- Make sure it's
imported
Make sure to import your new function (if you wrote it in a seperate file) at the top of your Routes file. I wrote it in my app/functions.py folder, so I import it asfrom app.functions import update_ghost. - Call & pass the right variables
To call the function, you're going to need to callupdate_ghost(name, email).nameandemailare variables, so you need to define them at some point before you call the function.
Here's what my final route ends up looking like (please note, this is may be wildly different for you). The function we've written is called on lines 10-12. I set my name as a variable, but use the ORM link for email.
@app.route("/verify_email/<token>") # Route for verifying user is real
def verify_email(token):
    user = User.verify_email_verification_token(token) # My ORM  link to getting the token.

    if user:
        user.is_verified = True
        db.session.commit()
        flash("Your email has been verified.")

        # Add to Ghost
        name = str(user.first_name) + " " + str(user.last_name)
        update_ghost(name, user.email)

    if not user:
        flash("There was a problem verifying your email")

    return redirect(url_for("auth.create_org"))
Step 3: Run It!
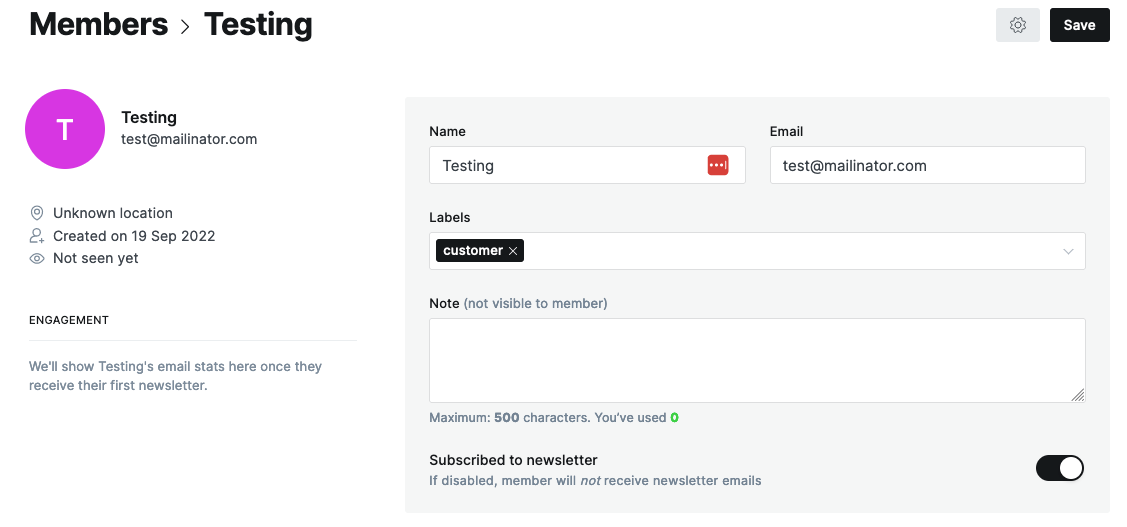
Now run the app. When you go through your flow, you should trigger the function and create a new member in Ghost with the label "customer". If it works, you'll create a new user with a metadata page that looks like this:
Because we also added in a print() statement at the end of our function, your terminal should show the results of your POST call as well. Assuming all goes well, you'll also see it tell you <Response [201]>, which means that one or more new resources have been successfully created on the server due to your call.
And that's all there is to it!
Thanks for reading
Useful? Interesting? Have something to add? Shoot me a note at roman@sharedphysics.com. I love getting email and chatting with readers.
You can also sign up for irregular emails and RSS updates when I post something new.
Who am I?
I'm Roman Kudryashov -- I help healthcare companies solve challenging problems through software development and process design. My longer background is here and I keep track of some of my side projects here.
Stay true,
Roman