The "Announcement" bar (or HelloBar in certain circles) is a really useful widget for showing timely information at the top of a page. It can come in all shapes and styles:


This post will cover an easy way to add a custom announcements bar into your ghost theme (which you can do for both premade and custom themes). It will also cover how to include some vanilla jabascript to make your announcement bar stay closed when you close it (and reappear when you change it), which you can apply outside of Ghost themes as well.
Getting Started
As I mentioned, you can add this functionality into premade themes or you can use the guidance in building your own themes. To get started, it helps to install Ghost locally and to set up your dev environment to sync changes as you make them.
We're also going to be using yarn to build and compile themes, so make sure to set that up. The link above will guide you through that process.
However, you don't have to run Ghost locally. You can compile your working files with yarn and just upload them directly to your site to test changes.
Making the Announcements Bar
Creating Custom Options in the Package.json file
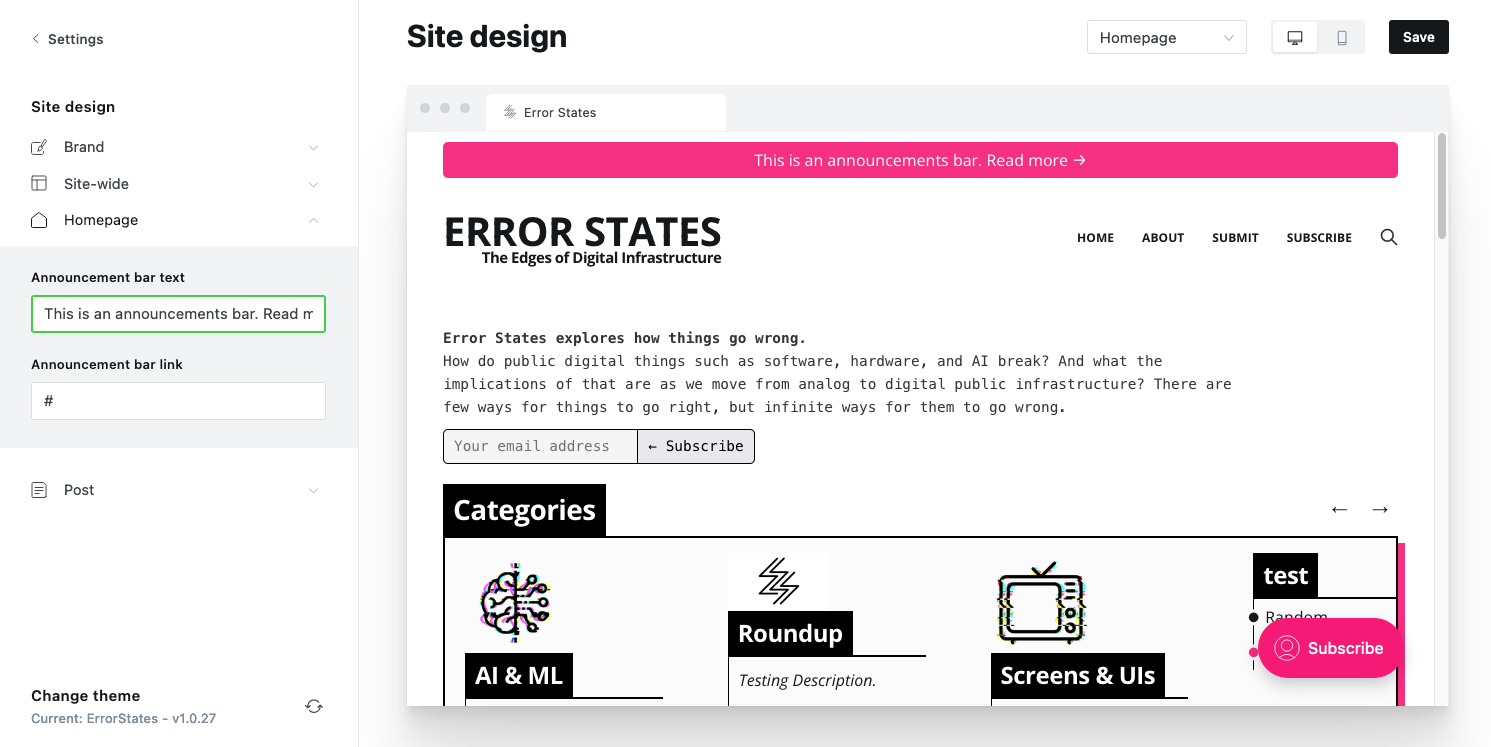
Every theme has a package.json file, and modifying that file allows you to create custom settings for your ghost theme. We're going to use that to add two menu options called "Announcement Bar Text" and "Announcement Bar Link".
To get started, open the package.json file in a code editor. If you're using a premade theme, you're likely already going to have a "custom" section; if not, you'll need to add it. It will look like this:
"custom": {
    "announcement_bar_text": {
        "type": "text",
        "default": "Sign up for more like this!",
        "group": "homepage"
    },
    "announcement_bar_link": {
        "type": "text",
        "default": "#",
        "group": "homepage"
    }
}
If you already have custom options, you'll need to make sure to add a comma to the last object before adding these two new options, as the last item in a json list won't have a comma.
What we're doing is:
- Creating a new menu option, formatted in
snake_case. So "accouncement_bar_text" will show up in the menu as "Announcement Bar Text" - Identifying it as a "type" (which is text). You can also use this to make lists, or true/false booleans.
- Setting defaults. These are fallback options in case you forget to fill something out.
- Grouping them to show up in a specific part of the site. We've grouped these to show up only on the homepage, but you can also set them to show up only on the posts page, or site-wide by leaving that option blank.
Creating the Announcement Bar Snippet
With that done, we're going to switch over to the "partials" folder in your theme directory, which contains a bunch of reusable code snippets. Create a new file named announcements-bar.hbs that lives inside of it, and open it up. This is a reusable snippet that we'll be pulling in.
Now we're going to pull in those options that we defined previously. Here's the code:
{{#if @custom.announcement_bar_text}}
    <a class="post-link" href="{{@custom.announcement_bar_link}}">{{@custom.announcement_bar_text}}</a>
{{/if}}
The {{#if}} statement checks if the announcement bar text field has any content. If it does, we build a link using data from the announcements_bar_link and announcements_bar_text fields.
Important to note is:
- Your text field will start out with a placeholder. To remove it, just delete the text.
- Your url field can be relative (such as
#/portal/) or absolute (such ashttps://yoursite.com/#/portal/).
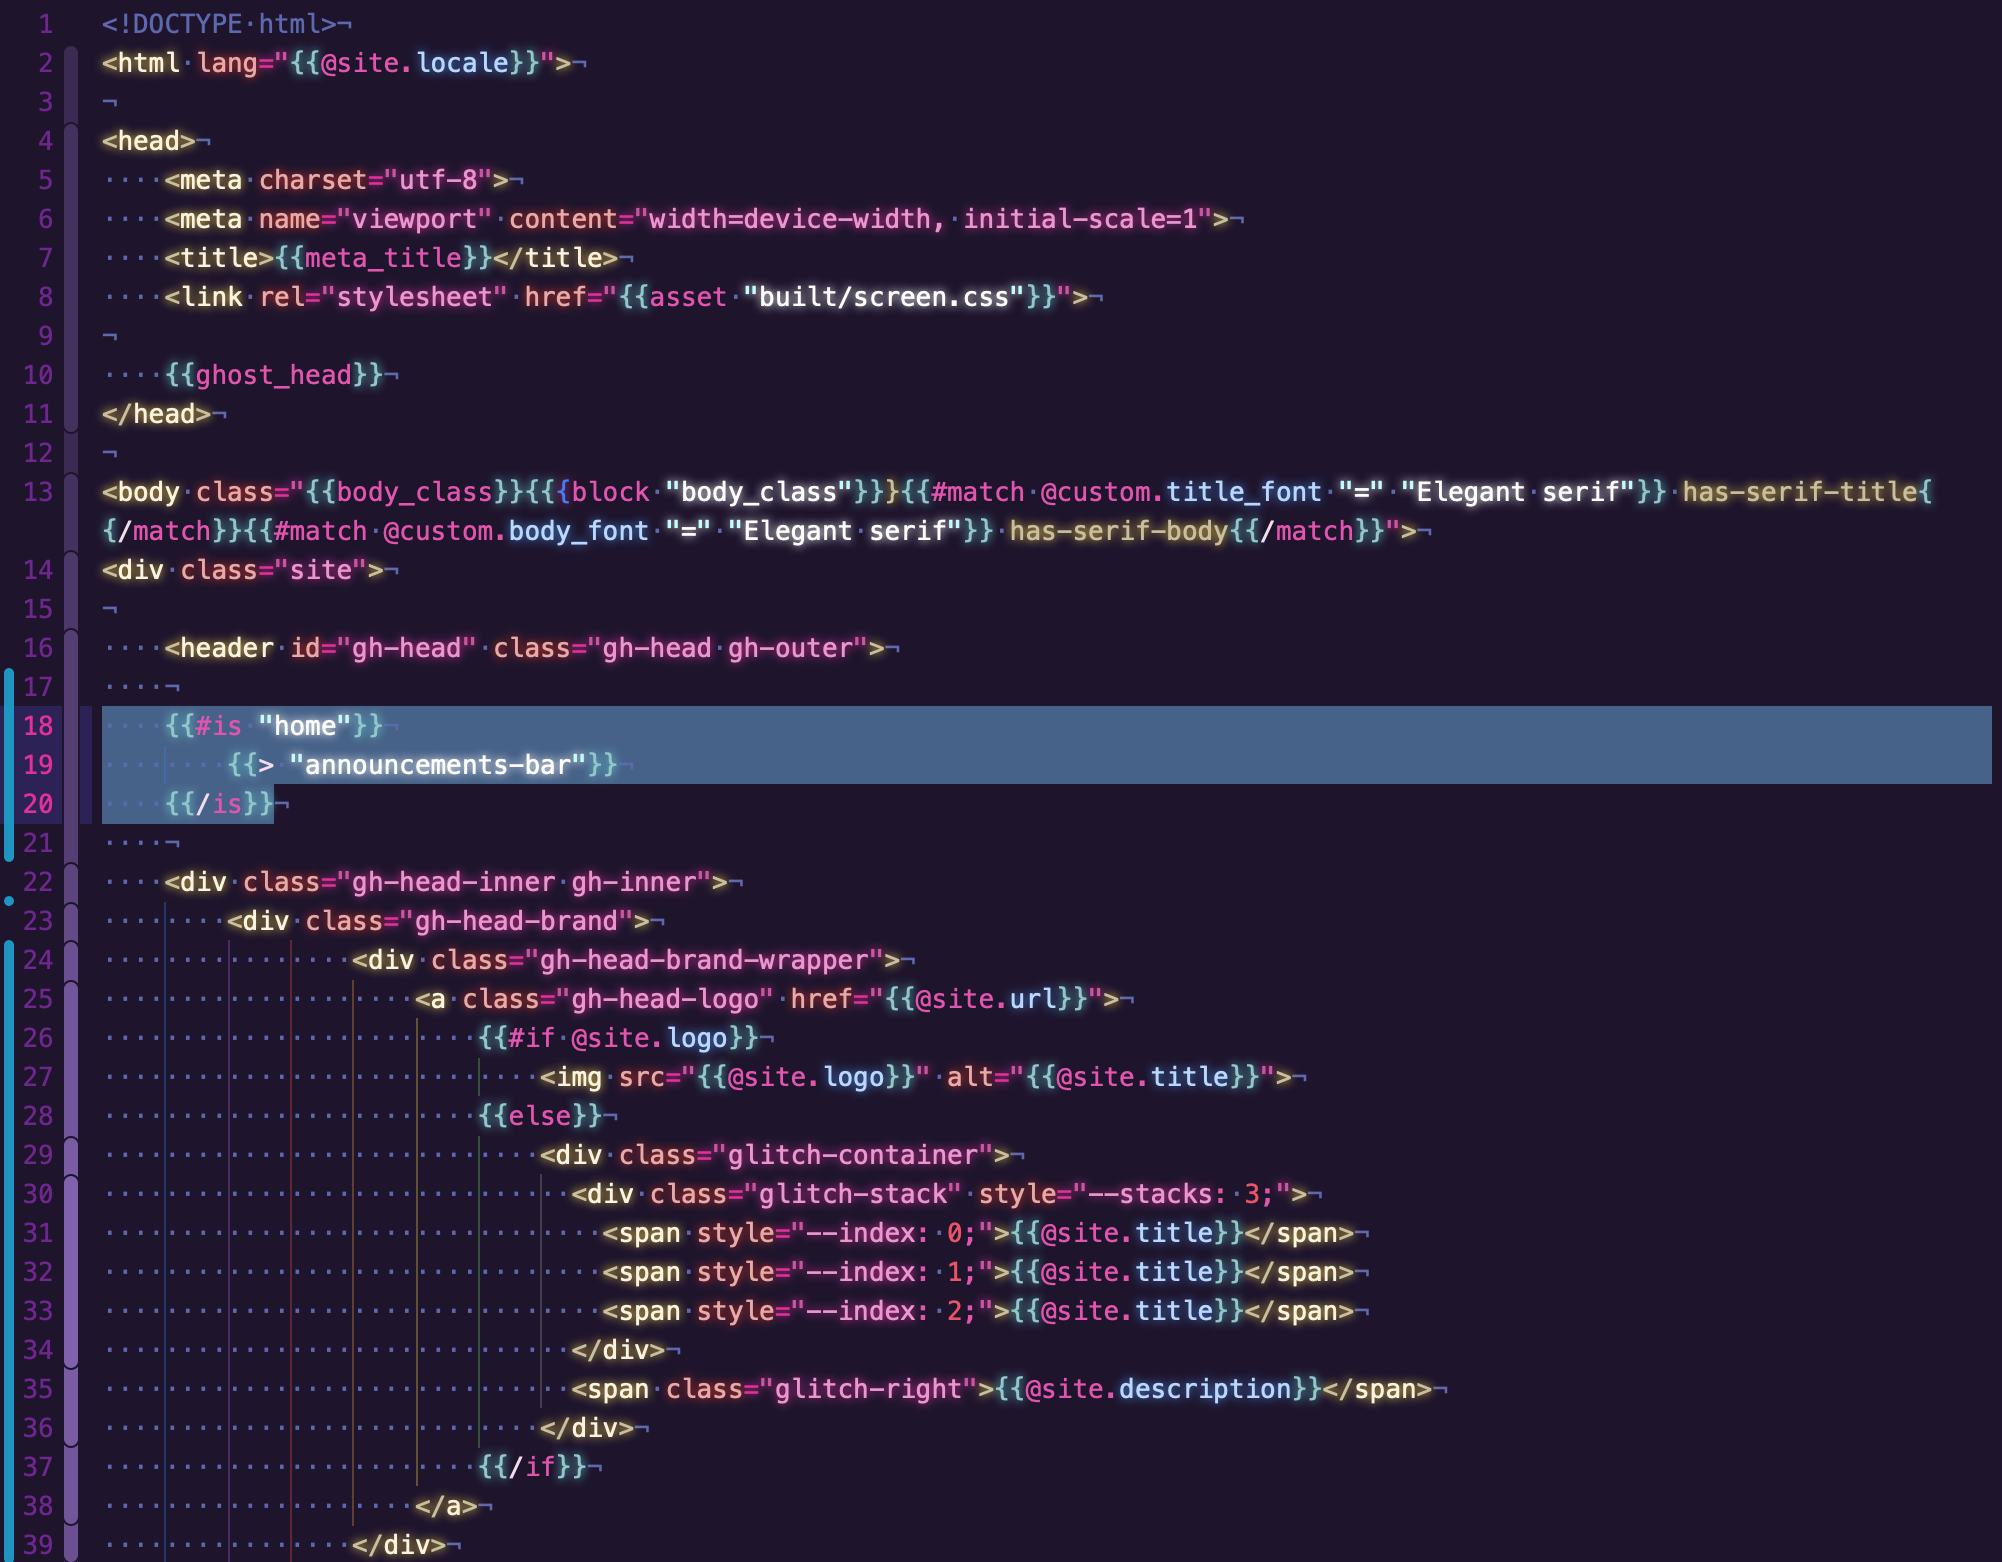
Now you need to call upon your new reusable snippet. You're likely going to want to add it in as the first/top-most thing in your theme, so find the file that starts your theme body. For me, it was default.hbs in the main theme directory. You can insert your new snippet with {{> "announcements-bar"}}.
You also need to decide now if you truly want this to be on just the homepage or on every page. The package.json group option only controls where it is grouped in the admin pages.
If you want your snippet to show up only on the homepage, then you either need to:
- Add it to the
index.hbswhich controls the body of the homepage (the tradeoff is that this will show up below the menu/headers). - Or wrap it in Ghost's {{is}} helpers. For us, that would look like this:
{{#is "home"}}
    {{> "announcements-bar"}}
{{/is}}
The last thing to do is to style the bar. This is going to be pretty specific to your theme and I can't give you too much advice here. However, here's a screenshot of how I handled it:
default.hbs file.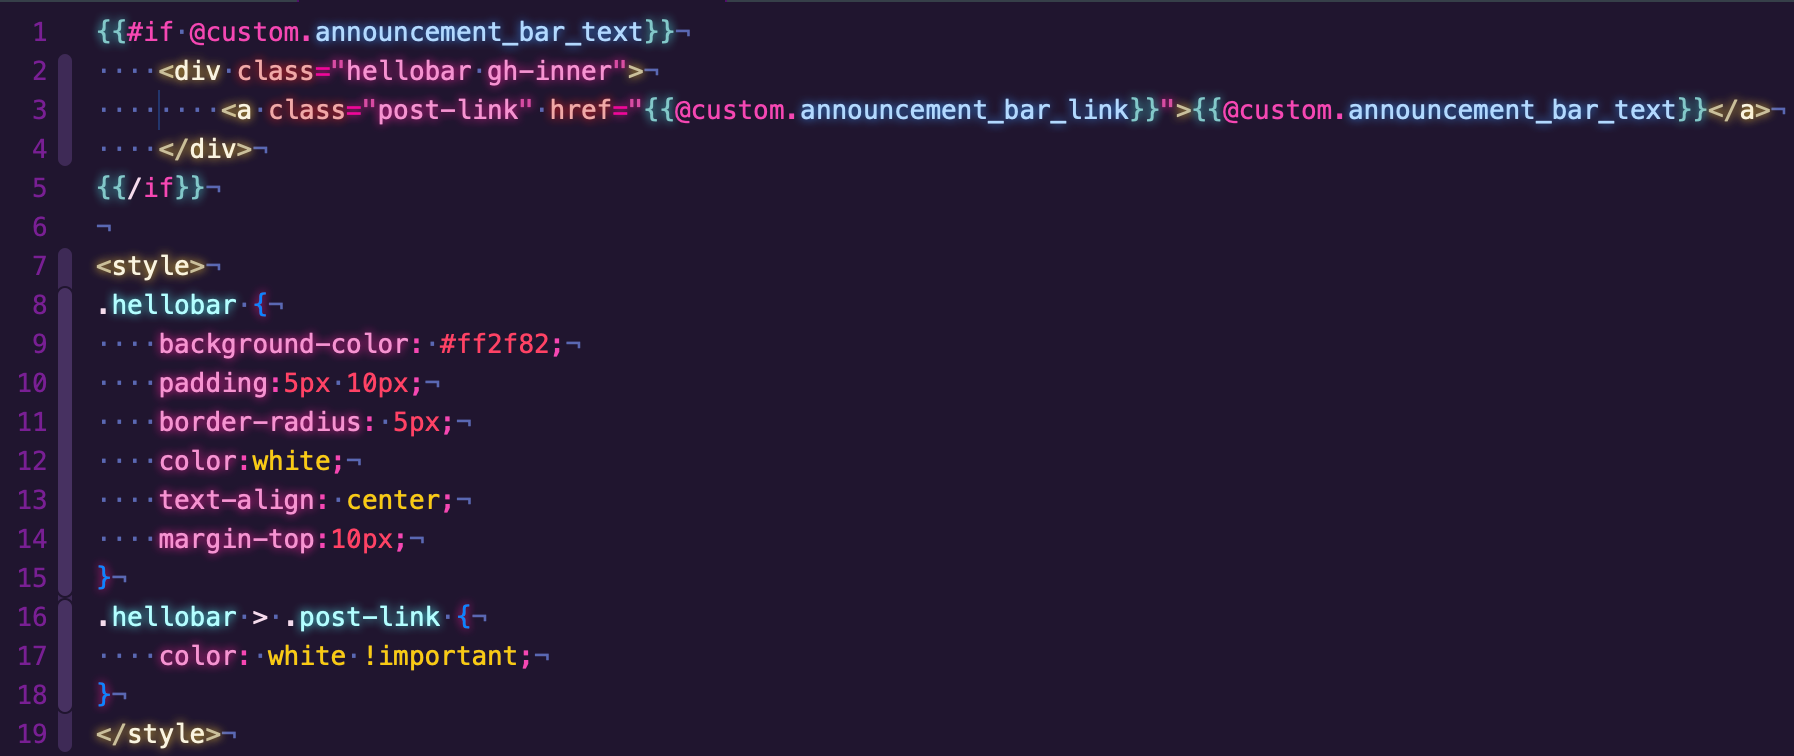
announcement-bar.hbs snippet looked like. It's a good practice to keep your css in the dedicated static css files directory, but because my code is simple I'm taking a few shortcuts.And with that, you're pretty much done. To see your new setting in action, go to the Admin panel, then Settings, then Design, and you'll see your options on the left hand side. If you've grouped them under homepage, they should appear like this:
Adding Persistence & "Close" Functionality
Announcement bars are nice, but sometimes you just want to close out of them... and not have them pop back up when you refresh the page.
We're going to handle that with some simple javascript by setting a local cookie to remember if you have closed the announcement bar.
To do this, you need to:
- Create a javascript-based "close" button
- Set a key:value pair to remember if you closed the bar
- Set an expiration timeline to forget your choice in the future (optional - if you leave it blank, it will autoforget when you close your browser)
Let's start by creating a cookie:
function closeAnnouncementBar() {
    document.cookie = "announcementsbar=closed;"
}
For the expiration date, we're going to set to be 7 days from now by figuring out today's date, converting that to a time number, adding in the right time (7 days * 24 hours * 60 minutes * 60 seconds * 1000 ms) and converting that back to a UTC string:
function closeAnnouncementBar() {

  // Setting the Date:
  const expiresDate = new Date();
  expiresDate.setTime(expiresDate.getTime() + (7*24*60*60*1000));
  let expiresValue = "expires="+ expiresDate.toUTCString();

  // Setting the Close parameter
  let closeValue = "announcementsbar=closed";

  document.cookie = closeValue + ";" + expiresValue + ";"
}
We're also going to want to reset the cookie if your content changes. To do this, we'll add the current content of the announcement bar into the cookie to check against it later.
Do this by adding an ID to your announcement bar div (we're going with id="announcementbar"), then use javascript to get the innerHTML and encode it to safe characters, and then save that as another cookie:
function closeAnnouncementBar() {
  const expiresDate = new Date();
  expiresDate.setTime(expiresDate.getTime() + (7*24*60*60*1000));
  let expiresValue = "expires="+ expiresDate.toUTCString();
  let closeValue = "announcementsbar=closed";

  // Setting the contents:
  let barHTML = document.getElementById("announcementbar").innerHTML;
  let encodebarHTML = encodeURIComponent(barHTML);
  let htmlValue = "htmlValue=" + encodebarHTML;

  document.cookie = closeValue + ";" + expiresValue + ";"
  document.cookie = htmlValue + ";" + expiresValue + ";"
}
... and lastly, we're going to trigger this function when the close button is clicked, and we want the announcement bar to disappear at that moment as well. For this, we need to add a display:none; style to the div. The full function will look like this:
function closeAnnouncementBar() {
  const expiresDate = new Date();
  expiresDate.setTime(expiresDate.getTime() + (7*24*60*60*1000));
  let expiresValue = "expires="+ expiresDate.toUTCString();
  let closeValue = "announcementsbar=closed";
  let barHTML = document.getElementById("announcementbar").innerHTML;
  let encodebarHTML = encodeURIComponent(barHTML);
  let htmlValue = "htmlValue=" + encodebarHTML;
  document.cookie = closeValue + ";" + expiresValue + ";"
  document.cookie = htmlValue + ";" + expiresValue + ";"
  let announcementbar = document.getElementById("announcementbar");
  announcementbar.style.display = "none";
}
Next, we're going to retrieve the cookie as a separate function, passing along either the announcementsbar, expires, or htmlValue as the key variable we want to retrieve:
function getCookie(key) {
  let name = key + "=";
  let cookieSplit = document.cookie.split(';');
  for(let i = 0; i < cookieSplit.length; i++) {
    let c = cookieSplit[i];
    while (c.charAt(0) == ' ') {
      c = c.substring(1);
    }
    if (c.indexOf(name) == 0) {
      return c.substring(name.length, c.length);
    }
  }
  return "";
}
The final function will be to check the cookies and perform some actions based on that. First we'll check if the innerHTMLs match. If they don't, we'll set the cookie to expire and the closeValue parameter to open. This is how we know to show the bar again if you change something about it.
Next we'll check if the closeValue is already closed and if the expires date is still in the future. If it is, then we'll toggle the visibility of the div to be hidden.
The code looks like this:
function checkBarCookie() {
  let previousHTML = getCookie("htmlValue");
  let rawCurrentHTML = document.getElementById("announcementbar").innerHTML;
  let currentHTML = encodeURIComponent(rawCurrentHTML);
  if (previousHTML != currentHTML) {
    document.cookie = "announcementsbar=;expires=Thu, 01 Jan 1970 00:00:00 UTC;"
  } else {
    let closeValue = getCookie("announcementsbar");
    let expiresValue = getCookie("expires");
    let today = new Date();
    let todayUTC = today.toUTCString();
    if (closeValue == "closed" && expiresValue < todayUTC) {
      let announcementbar = document.getElementById("announcementbar");
      announcementbar.style.display = "none";
    }
  }
}
Now, we'll need to put it all together.
Let's start by adding the the button and javascript trigger to your announcementbar.hbs file. Remember, we started with this:
{{#if @custom.announcement_bar_text}}
    <a class="post-link" href="{{@custom.announcement_bar_link}}">{{@custom.announcement_bar_text}}</a>
{{/if}}
.. and we're now going to add a simple button and the javascript:
{{#if @custom.announcement_bar_text}}
    <a id="announcementbar" class="post-link" href="{{@custom.announcement_bar_link}}">{{@custom.announcement_bar_text}} <button onclick="closeAnnouncementBar()">(Close)</button></a>
{{/if}}

<script>
function closeAnnouncementBar() {
  const expiresDate = new Date();
  expiresDate.setTime(expiresDate.getTime() + (7*24*60*60*1000));
  let expiresValue = "expires="+ expiresDate.toUTCString();
  let closeValue = "announcementsbar=closed";
  let barHTML = document.getElementById("announcementbar").innerHTML;
  let encodebarHTML = encodeURIComponent(barHTML);
  let htmlValue = "htmlValue=" + encodebarHTML;
  document.cookie = closeValue + ";" + expiresValue + ";"
  document.cookie = htmlValue + ";" + expiresValue + ";"
  let announcementbar = document.getElementById("announcementbar");
  announcementbar.style.display = "none";
}
function getCookie(key) {
  let name = key + "=";
  let cookieSplit = document.cookie.split(';');
  for(let i = 0; i < cookieSplit.length; i++) {
    let c = cookieSplit[i];
    while (c.charAt(0) == ' ') {
      c = c.substring(1);
    }
    if (c.indexOf(name) == 0) {
      return c.substring(name.length, c.length);
    }
  }
  return "";
}
function checkBarCookie() {
  let previousHTML = getCookie("htmlValue");
  let rawCurrentHTML = document.getElementById("announcementbar").innerHTML;
  let currentHTML = encodeURIComponent(rawCurrentHTML);
  if (previousHTML != currentHTML) {
    document.cookie = "announcementsbar=;expires=Thu, 01 Jan 1970 00:00:00 UTC;"
  } else {
    let closeValue = getCookie("announcementsbar");
    let expiresValue = getCookie("expires");
    let today = new Date();
    let todayUTC = today.toUTCString();
    if (closeValue == "closed" && expiresValue < todayUTC) {
      let announcementbar = document.getElementById("announcementbar");
      announcementbar.style.display = "none";
    }
  }
}
</script>
When I added CSS styling, I also wrapped my <a> tag in a div and applied the CSS styling to that div. If you do that, then make sure to move the id from your <a> tag to the parent <div>. The id is what identifies what to hide, so if you hide just the link but the parent div remains, you'll see a residual box just hanging out after closing the bar. So here's what that looks like for me:
{{#if @custom.announcement_bar_text}}
    <div id="announcementbar" class="announcementbar_css">
        <a class="post-link" href="{{@custom.announcement_bar_link}}">{{@custom.announcement_bar_text}} <button onclick="closeAnnouncementBar()">(Close)</button></a>
    </div>
{{/if}}
We're also going to find the <body> tag in the page HTML and call the checkBarCookie() function with an onload event. This make sure that when your page loads, if the cookie says your announcement bar is supposed to be closed, it will be closed. This will likely be in your default.hbs file again and will get added in like:
<body onload="checkBarCookie()">
...
</body>
And that should do it! You can check your cookie in the browser's dev tools/inspector by going to the "storage" tab, and selecting cookies:

... and you're done! Here's what it looks like in action: sweet and simple.

Bonus: Styling the Bar
Of course, having a giant button like in the screenshot above isn't ideal. If you want to style it so that the text is in the middle but the button is floating on the right side, there is a quick way to do that using CSS flexboxes.
You start by creating a parent div to house everything, and then adding three elements inside of it. Then you set the parent div to style=display:flex;justify-content:space-between;". This adds an equal amount of space between each element and creates the appearance you're looking for.
Here's the HTML code for that:
<div class="hellobar gh-inner" id="announcementbar">
<div></div>
<a class="post-link" href="{{@custom.announcement_bar_link}}">{{@custom.announcement_bar_text}} </a>
<button onclick="closeAnnouncementBar()">✖</button>
</div>Here is the CSS:
.hellobar {
    background-color: #ff2f82;
    padding:5px 10px;
    border-radius: 5px;
    color:white;
    text-align: center;
    margin-top:10px;
    display: flex;
    justify-content: space-between;
}
.hellobar > .post-link {
    color: white !important;
}
.hellobar > button {
  background-color: inherit;
  border: 0px;
  border-radius: 5px;
  color: white;
}
The first empty div is to balance the button on the other side so that your text is the middle element. Here's the end result:

Thanks for reading
Useful? Interesting? Have something to add? Shoot me a note at roman@sharedphysics.com. I love getting email and chatting with readers.
You can also sign up for irregular emails and RSS updates when I post something new.
Who am I?
I'm Roman Kudryashov -- I help healthcare companies solve challenging problems through software development and process design. My longer background is here and I keep track of some of my side projects here.
Stay true,
Roman